If you want to share files with others on Windows 10 or 11, there are different methods available depending on your needs. In this guide, we’ll explore 2 ways to do it:
- Basic Windows sharing: This is a simple way to share files with people on your local network without having to mess with complicated settings.
- Advanced Windows sharing: You can also use the built-in advanced Windows sharing feature. It’s more flexible than the basic sharing method.
In this guide, we’ll focus on teaching you how to share files using File Sharing on Windows 10 and 11. These methods should cover most of your file-sharing needs on both Windows 10 (and Windows 11 since the options are the same).
1. File sharing using Basic Sharing on Windows 10/11
- Open File Explorer.
- Navigate to the folder you want to share.
- Right-click the item, and select the Properties option.
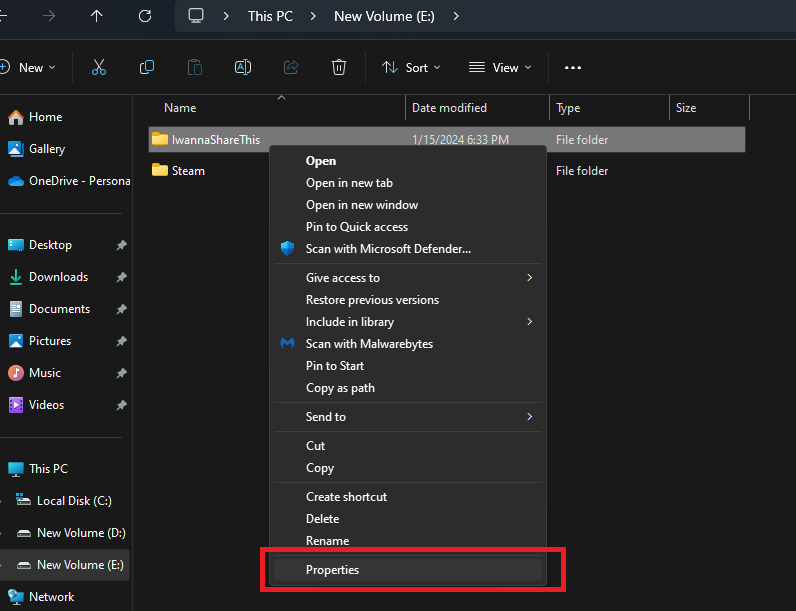
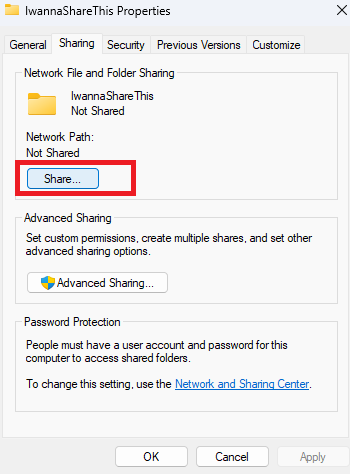
- Go to the Sharing tab.
- Click on the Share button.
- Click the drop-down menu and select the user or group to share the folder with. (For this example, we will select the Everyone group.)
- Click the Add button.
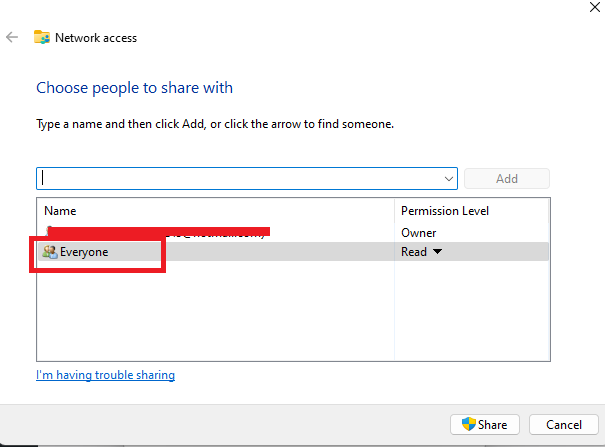
- In the “Permission Level” section, you can select the sharing permissions you want the users to have. For example, you can choose Read/Write, if you want users to view, open, delete, and modify the contents on the shared folder.
- Click the Share button.
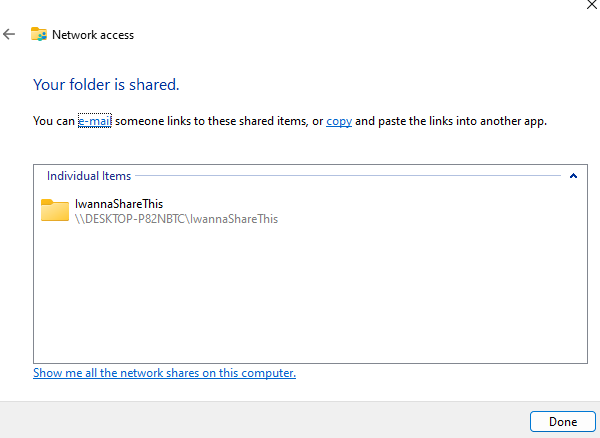
- Note down the shared folder’s network path that other users need to access the folder’s content and click Done.
- Click the Close button.
2. File sharing using advanced settings on Windows 10/11
To share files in the network using the advanced sharing settings, follow the steps below:
- Open File Explorer.
- Go to the folder you want to share.
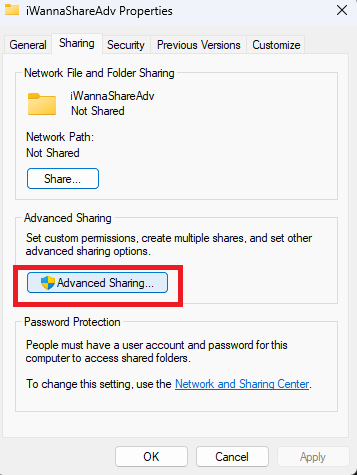
- Right-click the folder and select Properties.
- Go to the Sharing tab.
- Click Advanced Sharing.
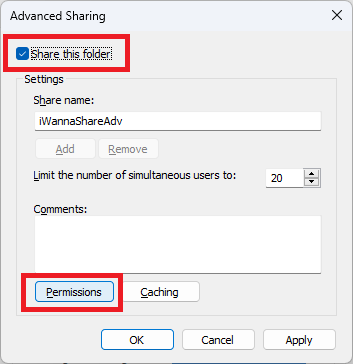
- Check the “Share this folder” option.
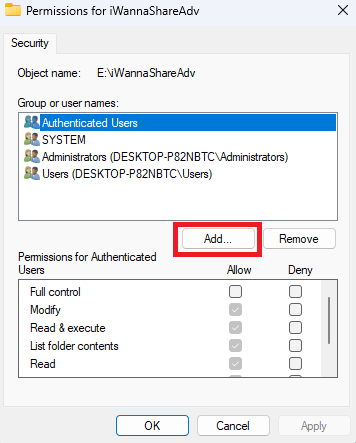
- Click Permissions.
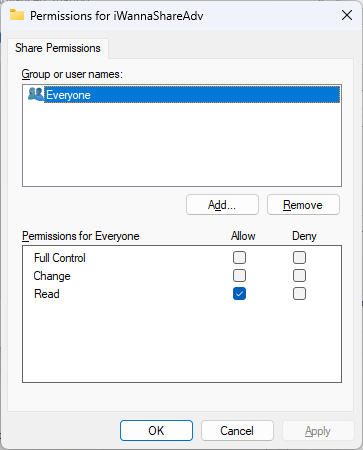
- Select the Everyone group.
- Check the permissions for the shared folder:
- Full Control: Gives the users the ability to read, change, and edit permissions.
- Change: Users can read, run, write, and delete files and folders in the shared location.
- Read: Allows users to only access and view the contents of the shared folder.
- ClickApply.
- Click OK.
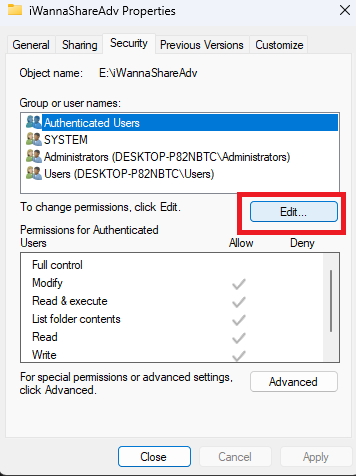
- Go to the Security tab.
- Click Edit.
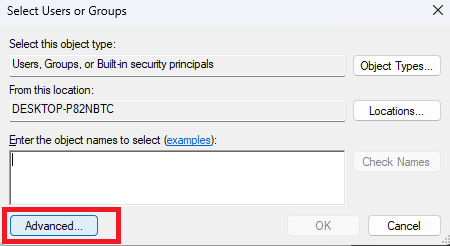
- Click Add.
- Click Advanced.
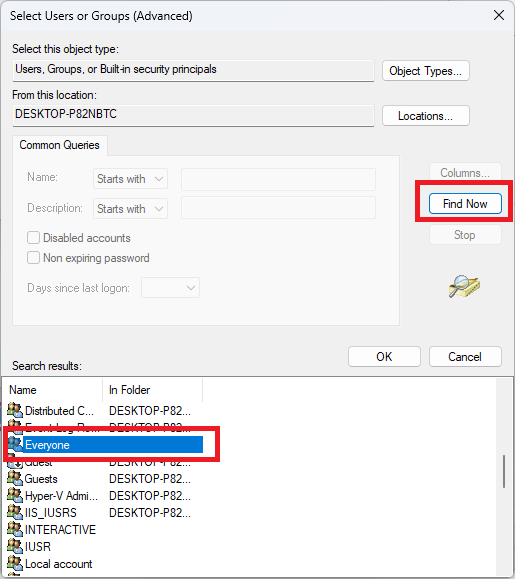
- Click Find Now.
- Select the Everyone group.
- Click OK.
- Click OK again.
- Select the Everyone group again.
- Check the Full control option.
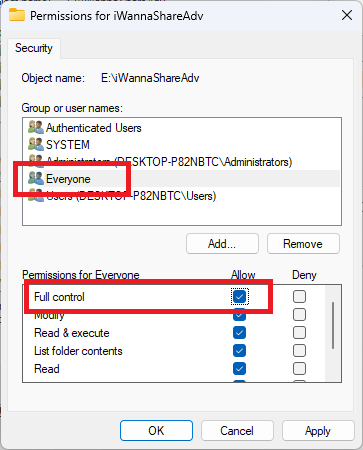
- Click Apply.
- Click OK.
- Click the Close button.
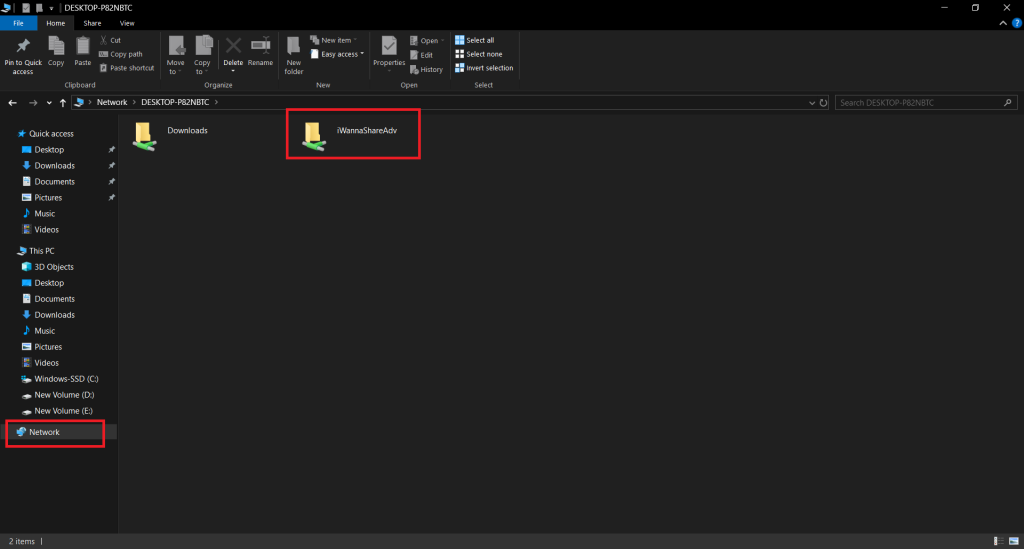
Once you complete the above steps, the shared folder will be available when on File Explorer > Network.
Below is a screenshot from another PC that can now access the shared folder and the contents inside it.
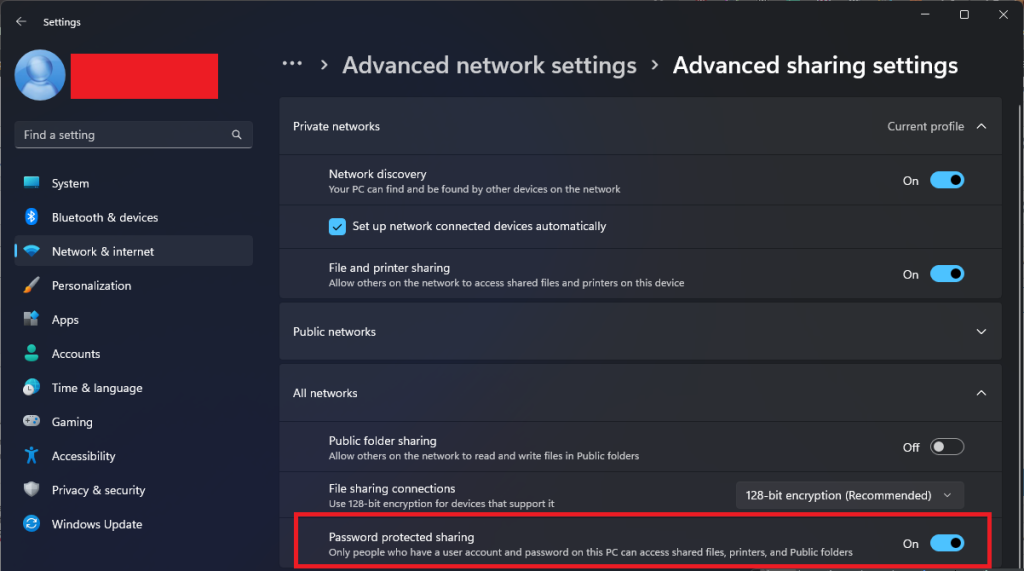
Disable file-sharing password on Windows 10/11
If you keep running into a pop-up asking you to sing-in before you can access the shared folder then you can disable disable password protection for file sharing on Windows 10/11, use these steps:
- Go to Settings.
- Click Network and Internet.
- Click Network and Sharing Center.
- Click the “Change advanced sharing settings”.

- Expand the All Networks tab.
- Select the “Turn off password-protected sharing” option.
- Click Save changes.

After you complete the steps, users should be able to access the shared folder without a password.
On Windows 11, go to Settings > Network & Internet > Advanced network settings > Advance sharing settings and turn off password protected sharing under All networks.
Convert your old quotes into TV ads
Your database of old customers stuck in a spreadsheet is pure profit. We use those “dead” emails and broadcast your business directly to that exact list on their living room TVs.
Our Wealth Filter automatically filters out neighborhoods that can’t pay, making sure your money only targets homeowners who can actually pay.
It’s a simple flat rate with zero management fees. Every dollar goes directly toward showing your ads to your best prospects.
Check local availability here:
https://topshelfpromotion.com
Not getting enough leads for Dilawar Me? Check out this video to see our AI traffic solution in action: https://www.youtube.com/shorts/iojvp6ZtjW4
Hello,
Saw your website and thought this could help.
There’s a completely free tool that lets you get listed fast across multiple classified sites with almost no effort.
Check this out:
https://classifiedsubmitter.com
It’s totally free and takes seconds.
Happy to share more free exposure tools.
Every partial financing approval, every full credit decline, and every financed job with 5–15% merchant financing fees attached is quietly pulling revenue out of your business.
Most contractors never calculate it.
When they do, it’s usually thousands of dollars a month in lost revenue and compressed margins.
Our customer financing program recovers it. Here is what it delivers:
+ 500 to 850 FICO: we approve the customers your current lender won’t
+ 0% for 21 months: the most competitive home improvement financing terms available
+ Zero merchant fees: zero per-loan fees, your business keeps every dollar
+ No need to switch: any contractor, any project, no restrictions of any kind
Works seamlessly alongside your existing lender or as your complete standalone program.
See full program info here: helloratesdealersolutions.com
Or use the link in my signature.
James
HelloRates Contractor Financing Solutions
Complete financing coverage for any contractor
Charleston, SC · helloratesdealersolutions.com
If you received this in error or would like to unsubscribe, visit helloratesdealersolutions.com/unsubscribe
Hi,
I’d like to propose a straightforward link exchange.
I can link to dilawar.me from 5 legitimate local business websites (DR30+), at no cost. In return, you’d link to 5 different of my client sites from your end — purely for mutual SEO value.
Let me know if you’re interested, and I’ll send over the site list.
Regards,
Clark
Is your BlackBerry available or should I try your flip phone?
Just trying to reach you about something important for your business.
BlackBerrys and flip phones were the best tools available at the time.
So was doing your follow-ups, review requests and invoice reminders manually.
That time has passed.
Automation handles all of it now. 24/7, automatically, whether you are there or not. Built for non-tech small business owners.
Start your free 14-day trial today: octopusdigitallabs.com
Zach
Octopus Small Business Automation
Charleston, SC
octopusdigitallabs.com
P.S. That time has passed. This one has not. Free for 14 days, no strings attached.
Attract high-quality visitors to your site with our AI-driven traffic solution, far more affordable than traditional paid advertising. Ready to boost your conversions?
https://marketingaged.com/
That list of old customers sitting in your database is found money. We take those “dead” emails and show your professional commercials directly to them on their living room TVs. It’s a flat rate with zero management fees. http://topshelfpromotion.com
Hi,
Hope you’re doing well.
I’ll keep this brief. I can place a link to dilawar.me on 5 genuine local business websites (DR30+), completely f.ree. In return, I’d appreciate links to 5 different of my client sites from your side — a simple, mutual SEO benefit.
If this sounds of interest, I’m happy to share the site list for your review.
Best regards,
Clark
Hi,
Hope all is well.
Long story short… I can link to your site dilawar.me from 5x legit local business websites (>DR30) — all FOC, no money involved. In return, you’d link to 5 different of my client sites from your end for a mutual SEO boost.
Interested? I can send you the site list to choose.
Cheers,
Clark
Hello,
Thought this might be useful for your website.
I wanted to share a free resource that helps you get more exposure for your business across multiple classified sites with a single submission.
If you want a quick visibility boost, here’s the URL:
http://www.classifiedsubmitter.com
It’s a free way to get more exposure and takes almost no time.
If you want, I can show you more free ways to get visibility.
Attract precise, keyword-driven traffic to your website with our AI-optimized service, costing much less than paid ad platforms. Start growing now.
https://marketingaged.com/
Hi,
I hope you’re having a great week.
I wanted to explore a potential SEO collaboration. I can offer links to dilawar.me from 5 well-maintained local business websites (DR30+), with no fees involved. In exchange, I’d appreciate links to 5 different of my client sites from your side — a balanced, mutually SEO beneficial arrangement to boost your website ranking on Google.
If this is something you’d consider, I’d be glad to share the site list for your review.
Kind regards,
Clark
Boost your dilawar.me website’s traffic with AI! Watch this to learn more: https://www.youtube.com/shorts/iojvp6ZtjW4
webdesign agentur bamberg https://websiteerstellenlassenbamberg.de/
Hi,
I’m putting together a small backlink collaboration and thought you might be a good fit.
I can place your site – dilawar.me on 5 quality local business websites (DR30+, ~2k–5k traffic), no payment needed.
In return, I’d ask for links to 5 of my client sites from your end — keeping it balanced and natural for SEO.
Let me know if you’d like to explore it.
Best,
Clark
Not getting enough leads for Dilawar Me? Check out this video to see our AI traffic solution in action: https://www.youtube.com/shorts/iojvp6ZtjW4
https://shorturl.fm/vnsAd
Convert your old quotes into TV ads
Your database of past quotes sitting in your database is a gold mine. We use those old lead lists and broadcast your TV ads directly to that exact list on the big screen.
Our technology automatically filters out neighborhoods that can’t pay, making sure your money is focused on wealthy clients.
It’s one flat rate with no hidden middleman costs. 100% of your spend goes directly toward your inventory to your best prospects.
Check local availability here:
https://www.topshelfpromotion.com
Watch this if you are struggling to get targeted leads to your dilawar.me website: https://www.youtube.com/shorts/iojvp6ZtjW4
I’ve noticed that your dilawar.me website could be missing out on approximately 1,000 visitors daily. Our AI powered traffic system is designed to significantly boost your site’s visibility. https://cutt.ly/Sw2BAXtw
We’re offering a free trial that includes 500 targeted visitors to demonstrate the potential benefits. After the trial, we can provide up to 250,000 targeted visitors per month. This opportunity could greatly enhance your website’s reach and engagement.
That list of old customers and past quotes sitting in your database is a gold mine. We take those “dead” emails and show your professional commercials directly to those homeowners on their living room TVs (and we produce those commercials for free).
Our system automatically filters out low-income areas, ensuring your budget only targets the high-ticket jobs you actually want.
It’s one flat rate with zero management fees. Every dollar you spend goes directly toward showing your ads to your best prospects.
Want to see if your service area is open? topshelfpromotion.com
That list of old customers sitting in your database is found money. We take those “dead” emails and show your professional commercials directly to them on their living room TVs. It’s a flat rate with zero management fees. https://www.topshelfpromotion.com
That list of old customers and past quotes sitting in your database is a gold mine. We take those “dead” emails and show your professional commercials directly to those homeowners on their living room TVs (and we produce those commercials for free).
Our system automatically filters out low-income areas, ensuring your budget only targets the high-ticket jobs you actually want.
It’s one flat rate with zero management fees. Every dollar you spend goes directly toward showing your ads to your best prospects.
Want to see if your service area is open? https://topshelfpromotion.com
Your old lead list is a gold mine. We take those “dead” contacts and show your professional commercials directly to them on their living room TVs. It’s the fastest way to turn past interest into new business at a flat rate. https://www.topshelfpromotion.com
That list of old customers sitting in your database is found money. We take those “dead” emails and show your professional commercials directly to them on their living room TVs. It’s a flat rate with zero management fees. http://topshelfpromotion.com
Tired of wasting your budget on leads that aren’t a fit? Our Wealth Filter automatically skips low-income areas so your ads only reach the people who can afford your premium services. Simple, transparent, and high-impact. topshelfpromotion.com
When was the last time you checked your current business borrowing power?
Smart business owners update and benchmark their business borrowing power on a quarterly basis.
It’s the recommended frequency that keeps them prepared for unexpected cash flow challenges, emergencies, and exciting business opportunities.
Our simple 2-minute borrowing power check is used by thousands of businesses monthly to confirm their:
→ Maximum funding potential → Market rate → Loan term options → Payment
So you never have to guess when the need is present.
If you don’t know your number, that’s a risk your business is carrying right now.
At least find out. It takes 2 minutes and costs nothing.
Get My Number http://www.helloratesfastfunding.com
No credit impact. No obligation. No spam.
Just confidence in how your business can work for you.
Ryan
Senior Business Funding Advisor, HelloRates
HelloRates Business Funding Solutions helps thousands of businesses explore commercial financing options. This is not a credit application. Checking your borrowing power has no impact on your credit score. Offer only available to US based businesses.
Most business opportunities don’t wait. Does your business know what capital it can access right now?
Smart business owners benchmark their business borrowing power every quarter.
It’s the recommended frequency that keeps them ready to move fast on exciting opportunities, unexpected emergencies, and cash flow challenges without scrambling to figure out their options after the fact.
Our simple 2-minute borrowing power check is used by thousands of businesses monthly to confirm their:
→ Maximum funding potential → Market rate → Loan term options → Payment
So when the moment arrives, you already know your number.
If you don’t know yours, that’s a risk your business is carrying right now.
At least find out. It takes 2 minutes and costs nothing.
Get My Number http://www.helloratesfastfunding.com
No credit impact. No obligation. No spam.
Just confidence in how your business can work for you.
Ryan
Senior Business Funding Advisor, HelloRates
HelloRates Business Funding Solutions helps thousands of businesses explore commercial financing options. This is not a credit application. Checking your borrowing power has no impact on your credit score. Offer only available to US based businesses.
The most prepared business owners all have one thing in common. They already know their number.
Benchmarking your business borrowing power every quarter is the recommended frequency that keeps you confident and ready for unexpected cash flow challenges, emergencies, and exciting business opportunities.
Our simple 2-minute borrowing power check is used by thousands of businesses monthly to confirm their:
→ Maximum funding potential → Market rate → Loan term options → Payment
So you never have to guess when the need is present.
If you don’t know your number yet, it takes 2 minutes and costs nothing to find out.
Get My Number http://www.helloratesfastfunding.com
No credit impact. No obligation. No spam.
Just confidence in how your business can work for you.
Ryan
Senior Business Funding Advisor, HelloRates
Not getting enough leads for Dilawar Me? Check out this video to see our AI traffic solution in action: https://www.youtube.com/shorts/iojvp6ZtjW4
Hi,
I’ve got a simple collab idea — I can place links to your site – dilawar.me on 5 legit local business websites (DR30+, ~2k–5k monthly traffic), completely free.
In return, you’d link to 5 of my client sites. Clean, fair exchange for a mutual SEO boost.
Let me know if you’re open to it.
Best,
Clark
Not getting enough leads for dilawar.me? Check out this video to see our AI traffic solution in action: https://www.youtube.com/shorts/iojvp6ZtjW4
Need more clicks and conversions for Dilawar Me? Watch this short video about our AI-powered traffic service: https://www.youtube.com/shorts/iojvp6ZtjW4
Not getting enough leads for dilawar.me? Check out this video to see our AI traffic solution in action: https://www.youtube.com/shorts/iojvp6ZtjW4
Hi,
Reaching out with a quick win for both sides.
I can get your site – dilawar.me featured on 5 real local business sites with solid authority (DR30+) and steady traffic (2k–5k/month). No cost involved.
In exchange, I’d be looking for links to 5 of my client sites from your end — simple and mutually beneficial.
Let me know your thoughts.
Best,
Clark
Ready to drive targeted visitors to your Dilawar Me site? This quick video explains how our AI works: https://www.youtube.com/shorts/g7kzTx0QZ4g
Why choose costly paid ads? Our AI-powered service drives keyword and location-specific traffic to your website, boosting ROI at a budget-friendly rate.
https://marketingaged.com/
Hey, This is Vicky. I am a Website developer and designer specializing in WordPress, html, php, css ,js, Informative websites,E-Commerce stores. If you need any assistance in creating a new page, new design, developing new functionality, changing any existing functionality, monthly maintenance, any theme related work or uploading content, then let’s have a video call. I will show you the websites that I have developed. The best part is that I charge just $20/hr to $40/hr depending on the complexity of work.
Feel free to send me an email at [email protected] to discuss it further.
I’ve noticed that your dilawar.me website could be missing out on approximately 1,000 visitors daily. Our AI powered traffic system is designed to significantly boost your site’s visibility. https://cutt.ly/Sw2BAXtw
We’re offering a free trial that includes 500 targeted visitors to demonstrate the potential benefits. After the trial, we can provide up to 250,000 targeted visitors per month. This opportunity could greatly enhance your website’s reach and engagement.
Struggling to get targeted leads to your dilawar.me website? Watch this: https://www.youtube.com/shorts/g7kzTx0QZ4g
Discover how our AI can skyrocket your Dilawar Me website leads in this quick video: https://www.youtube.com/shorts/g7kzTx0QZ4g
Watch this if you are struggling to get targeted leads to your dilawar.me website: https://www.youtube.com/shorts/rTwcDCntnYg
Our AI-powered service sends location-specific traffic to your website, far more affordable than paid advertising platforms. Connect with us to see results.
https://cutt.ly/7tX1G5w9
Ready to drive targeted visitors to your Dilawar Me site? This quick video explains how our AI works: https://www.youtube.com/shorts/rTwcDCntnYg
Hi, My name is Rahul. I am a Data Entry Virtual Assistant. I will follow your step-by-step process and get things done for you at just USD 9 per hour.
I can do Online Data Entry, Medical Bill Data Entry, Copy Paste Work, Document Data Entry, Physical to Digital Document Conversion, WooCommerce/Magento/Shopify Product Data Entry, Amazon/Ebay/Etsy/Walmart/Target Product Data Entry, Facebook Shop/Google Merchant Store Product Data Entry, Application Forms Data Entry, Software Data Entry, Invoice/Billing Data Entry Processing, Insurance Claim Processing, Order Entry, Purchase Entry, Captcha Filling, 1 by 1 Manual Entry, Step-by-Step Process Entry, E-Commerce Product Data Entry, Market Research Forms Processing, Credit Cards Form Processing, Survey Forms Processing, Mortgage Forms Processing, Data Collection, Sales Leads, List Collection using your Strategy and Criteria, List Creation, Typing Work, Data capturing from websites, WordPress/Shopify Data Entry, Web scrapping and putting data into excel sheet, Proper formatting of excel entries, Resolve different formats of excel entries into 1 format, Process repetition, Google spreadsheet, Property data research, Linkedin Data Collection, Business Card Data Entry, Finding leads online.
If you have any requirements, please send me an email on [email protected]
Boost your Dilawar Me website’s traffic with AI! Watch this to learn more: https://www.youtube.com/shorts/rTwcDCntnYg
Hey,
I found your site and thought this might help.
I wanted to share a free resource that helps you get seen on more platforms across multiple classified sites with a single submission.
If you want to push your site out wider, here’s the address:
https://classifiedsubmitter.com
It’s a free traffic booster and takes under a minute.
If you want more free traffic tools, let me know.
Hope you’re well,
I noticed your business online and wanted to pass this along.
Here’s a free service that can help you get seen on more platforms across multiple classified sites with just a few clicks.
If you want to push your site out wider, here’s the address:
classifiedsubmitter.com
It’s a free way to get more exposure and takes about 60 seconds.
I can send more ways to promote your site if you want.
Hey,
Came across your site and figured this was worth sending.
There’s a completely free tool that lets you get more exposure across multiple classified sites with just a few clicks.
Go here:
http://www.classifiedsubmitter.com
It’s totally free and takes almost no time.
Happy to share more free exposure tools.
Hi,
Thought you might want this.
There’s a free tool that lets you promote your site across multiple classified sites with a single submission.
Use this:
classifiedsubmitter.com
It’s a free traffic booster and takes seconds.
Reply if you want more ways to promote your site.
Hello,
Noticed your business online and wanted to pass this along.
There’s a free tool that lets you boost your visibility across multiple classified sites with almost no effort.
Here’s the URL:
http://www.classifiedsubmitter.com
It’s a free way to get exposure and takes less time than posting manually.
I can send more free traffic resources.
Hi,
Came across your site and figured this was worth sending.
There’s a completely free tool that lets you promote your site across multiple classified sites with one form.
This is it:
http://www.classifiedsubmitter.com
It’s free to use and takes less time than posting manually.
If you want more free tools, let me know.
Boost your Local presence and stand out with our expert Local SEO and Google My Business services! Elevate your visibility, attract more customers, and dominate your local market. Reach out to us today at [email protected] and let’s optimize your online presence.
Hi,
Found your site and wanted to share this.
There’s a completely free tool that lets you get more exposure across multiple classified sites with just a few clicks.
Go here:
https://classifiedsubmitter.com
It’s a free traffic booster and takes seconds.
I can send more free traffic resources.
Discover how our AI can skyrocket your Dilawar Me website leads in this quick video: https://www.youtube.com/shorts/rTwcDCntnYg
Not getting enough leads for dilawar.me? Check out this video to see our AI traffic solution in action: https://www.youtube.com/shorts/rTwcDCntnYg
Hi,
I just visited dilawar.me and wondered if you’ve ever considered an impactful video to advertise your business? Our videos can generate impressive results on both your website and across social media.
Our videos cost just $195 (USD) for a 30 second video ($239 for 60 seconds) and include a full script, voice-over and video.
I can show you some previous videos we’ve done if you want me to send some over. Let me know if you’re interested in seeing samples of our previous work.
Regards,
Joanna
Hi, I checked your website and felt that adding more quality content/blogs could help make the website look more active and professional for visitors.
Along with SEO benefits, good content also helps build trust and can improve conversions when potential clients visit your website.
If you want, I can share a couple of blog topic and keyword ideas relevant to your business.
You can reply at:
[email protected]
I’ve noticed that your dilawar.me website could be missing out on approximately 1,000 visitors daily. Our AI powered traffic system is designed to significantly boost your site’s visibility. https://cutt.ly/Sw2BAXtw
We’re offering a free trial that includes 500 targeted visitors to demonstrate the potential benefits. After the trial, we can provide up to 250,000 targeted visitors per month. This opportunity could greatly enhance your website’s reach and engagement.
Discover how our AI can skyrocket your Dilawar Me website leads in this quick video: https://www.youtube.com/shorts/rTwcDCntnYg
Hi, We provide dedicated remote support teams for E-Commerce businesses that need reliable assistance with backend operations and daily store management.
Our support services include:
> Product Uploads and Store Maintenance
> Order Processing and Tracking
> Customer Service via Email and Chat
> Marketplace Management
> Inventory and Pricing Updates
> Blog and Product Content Writing
> Social Media Management
> Bookkeeping and Reporting
> Data Entry and Administrative Support
Our team has experience working on Shopify, WooCommerce, Magento, Amazon, Etsy, Walmart, Ebay, WordPress, Wix, and other platforms.
We offer flexible engagement models starting from $9/hr and can scale according to your requirements.
Please let us know if you would like to schedule a short meeting to explore possible collaboration. Reply us on [email protected]
Tired of low website traffic? This video shows how our AI can help: https://www.youtube.com/shorts/rTwcDCntnYg
Attract high-quality visitors to your site with our AI-driven traffic solution, far more affordable than traditional paid advertising. Ready to boost your conversions?
https://cutt.ly/ktX1Hq5L
Attract high-quality visitors to your site with our AI-driven traffic solution, far more affordable than traditional paid advertising. Ready to boost your conversions?
https://marketingaged.com/
Ready to drive targeted visitors to your Dilawar Me site? This quick video explains how our AI works: https://www.youtube.com/shorts/rTwcDCntnYg
https://shorturl.fm/hIKl7
Ready to drive targeted visitors to your dilawar.me site? This quick video explains how our AI works: https://www.youtube.com/shorts/rTwcDCntnYg
Hi,
I’m reaching out because we help brands connected to dilawar.me build authority on Instagram.
We use our customized AI system, mixed with natural manual interaction to drive niche-relevant followers to your page safely.
Open to finding out more about this?
Gemma
Need more clicks and conversions for Dilawar Me? Watch this short video about our AI-powered traffic service: https://www.youtube.com/shorts/rTwcDCntnYg
Watch this if you are struggling to get targeted leads to your dilawar.me website: https://www.youtube.com/shorts/rTwcDCntnYg
Hi,
It looks like dilawar.me might not be fully leveraging Google Ads to capture active search traffic in your market.
Right now, there is a consistent stream of high-intent buyers typing commercial search terms directly into Google looking for exactly what you offer. Without a highly optimized campaign running, dilawar.me can miss out on top-tier visibility at the exact moment they are looking to buy, meaning you miss out on those daily conversions.
We have over 20 years of experience managing Google Ads (back when it was still called AdWords). We build precision campaigns that place your website prominently in the search results, ensuring your budget is protected from inefficient clicks.
Are you open to seeing a quick, text-based example of how this would look for dilawar.me?
Best regards,
Joanna
We create stunning, professional, and fully mobile-responsive websites that help businesses build trust and attract more customers online. Our website packages start from $700 and can go up to $3,000 depending on the design, customizations, features, and technology required.
Template-based websites are usually more affordable because the design structure is already created, reducing development time. If you need a completely custom design built specifically for your brand, the cost is generally higher due to the additional design and development work involved.
If you’d like, I can also share some sample websites we have created. Feel free to tell us a little about your requirements, preferred design style, and any features you need, and we’ll be happy to provide recommendations and a customized quote.
Reply to [email protected] for more details.
I’ve noticed that your dilawar.me website could be missing out on approximately 1,000 visitors daily. Our AI powered traffic system is designed to significantly boost your site’s visibility. https://cutt.ly/Sw2BAXtw
We’re offering a free trial that includes 500 targeted visitors to demonstrate the potential benefits. After the trial, we can provide up to 250,000 targeted visitors per month. This opportunity could greatly enhance your website’s reach and engagement.
Hi,
I’m a data analyst specializing in highly targeted B2B databases. If you work with B2B clients, I can build custom decision-maker lists for any niche — including verified emails, mobile numbers, and more.
By decision makers, I don’t just mean business owners and CEOs — I also cover managers and department heads who have real influence over the direction a company takes.
I accept PayPal, so there’s full buyer protection for your customers.
Feel free to reach out at: [email protected]==+++
Happy to discuss further if this is a fit.
Best regards
Attract keyword-driven visitors to your site with our AI-optimized solution, saving you money compared to costly paid ads. Ready to scale your business?
https://marketingaged.com/
Attract the right audience to your site with our AI-driven traffic solution, offering better results than paid ads at a fraction of the price. Get started today.
https://cutt.ly/pt2q785R
Hi,
We provide dedicated remote support teams for E-Commerce businesses that need reliable assistance with backend operations and daily store management.
Our support services include:
> Product Uploads and Store Maintenance
> Order Processing and Tracking
> Customer Service via Email and Chat
> Marketplace Management
> Inventory and Pricing Updates
> Blog and Product Content Writing
> Social Media Management
> Bookkeeping and Reporting
> Data Entry and Administrative Support
Our team has experience working on Shopify, WooCommerce, Magento, Amazon, Etsy, Walmart, Ebay, WordPress, Wix, and other platforms.
We offer flexible engagement models starting from $9/hr and can scale according to your requirements.
Please let us know if you would like to schedule a short meeting to explore possible collaboration. Reply us on [email protected]
Our AI-optimized service sends high-intent, keyword-targeted visitors to your site, saving you money compared to paid ad campaigns. Ready to get started?
https://marketingaged.com/
Storytelling through video is a powerful way to connect with your audience on your website. We deliver polished, effective videos that drive real results—see an example here:
https://www.youtube.com/shorts/SglkEN-n7_U
Grow your site’s audience with our AI-driven traffic service, significantly cheaper than paid ad platforms. Contact us to explore the benefits.
https://marketingaged.com/
We help businesses like yours create engaging video content that turns website visitors into customers. Our custom videos have helped similar companies increase engagement and sales—check out this example:https://www.youtube.com/shorts/SglkEN-n7_U
I’ve noticed that your dilawar.me website could be missing out on approximately 1,000 visitors daily. Our AI powered traffic system is designed to significantly boost your site’s visibility. https://cutt.ly/Kt4CPXgV
We’re offering a free trial that includes 500 targeted visitors to demonstrate the potential benefits. After the trial, we can provide up to 250,000 targeted visitors per month. This opportunity could greatly enhance your website’s reach and engagement.
Unlock more targeted leads with our AI! Watch this short video to get started: https://www.youtube.com/watch?v=UEooLHpFYW0
Hi,
I was just looking at dilawar.me and wanted to ask: are you looking to scale your Instagram presence right now?
We help brands like yours add 300+ targeted Instagram followers every month using manual outreach and ads. We can grow your existing page or even build a brand-new profile from scratch for you if you’d prefer a fresh start.
Would you like me to send over some more info on how it works?
Thanks for your time,
Gemma